Showing posts with label Reconnaissance. Show all posts

Sunday, March 3, 2013

How To Run A Basic Nessus Scan


Nessus a vulnerability scanning application created by Tennable Networks.  Nessus is used to scan computers and assets for vulnerabilities.  The vulnerabilities can be anything from missing passwords to buffer overflow exploits.  Nessus is heavily used in the network security industry to locate and mitigate risks.  In this tutorial we will be using Nessus to conduct a basic vulnerability scan of an asset.
1.  Like in previous examples, we will be using Metasploitable as our target.  Launch Metasploitable as a virtual machine.  In this tutorial, Metasploitable will have an IP address of 10.0.0.21.


2.  Launch Backtrack5 r3.  This will be the host conducting the scan.  This instance of Backtrack5 will also be launched through Oracle's VirtualBox.


3.  Start the Nessus service by typing nessusd start in console.  


4.  Once the Nessus service has been started, open Firefox.  In the address bar type 
https://127.0.0.1:8834.  Visiting this local address gives us Nessus's graphical user interface.   


5.  While on the local Nessus home page, type in your previously setup user name and password.  

6.  Once logged in, we are provided with many different features.  The Reports section gives us a listing of completed scans.  The Scan section is where a user can schedule or execute a scan.  The Policies section displays the types of scans available.  Lastly, the Users section is an access control list where Nessus users can be added or removed.  


7.  Let's begin setting up a basic scan.  Click the Scan section and click the Add button.  
8.  First, name the scan.  In this example I named it Metasploitable_Scan.  Leave the type as Run Now.  In the policy drop down menu, select Internal Network Scan.  The 'Scan Targets' field allows us to specifiy multiple IP addresses, but we will be simply entering 10.0.0.21.  Leave the 'Targets File' area blank.  Click Launch Scan at the bottom of the page.


9.  Once the Scan has been launched, we are taken back to the 'Reports' page.  The 'Reports' page displays the Metasploitabe_Scan as running.  Double click the Metasploitable_Scan field.  Once double clicked, Nessus will show us a real-time display of its progress.  We can already see that there are many critical vulnerabilities in regards to the Metasploitable operating system.


10.  Once the scan is completed, go back to the Reports section. Select the Metasploitable_Scan report and then click the Download button.  In drop down menu, select HTML export.  


11.  Hit submit.  If all goes accordingly, you will be presented with a very well documented vulnerability report in HTML.


Having a vulnerability report in HTML is very useful when showing your findings to a client.  It is also easy to save and transport.  A user is able to conduct scans at predetermined times, this is a good option because vulnerability scans have the ability to crash important enterprise systems.  Whenever possible run Nessus scans on off-business hours.  Nessus is an important tool in security professional's repertoire.  It is important because it can help "bullet proof" important network assets.

Friday, February 22, 2013

Conducting an Nmap Scan and Exporting The Findings As An XML Report


Nmap is a multifaceted application used for network reconnaissance.  Whether it be a white hat, grey hat or black hat, NMAP is often considered a very essential tool.  According to Nmap.orgs's official website the application is described as "a free and open source utility for network discovery and security auditing."  The website also explains that "Nmap uses raw IP packets in novel ways to determine what hosts are available on the network, what services (application name and version) those hosts are offering, what operating systems (and OS versions) they are running, what type of packet filters/firewalls are in use, and dozens of other characteristics."  If you are interested in more official information on Nmap, visit their website here.

This tutorial is a demonstration on how a user can conduct moderately advanced Nmap scan.  Once we've completed the Nmap scan, the findings will be exported to an XML report for our review.  Let's get started.
 

1.  Start Metasploitable as a virtual machine.  Metasploitable will be the target host.  If you are unfamiliar Metasploitable, a basic configuration guide can be found here.


I first logged into Metasploitable and discovered it's local IP address.  I did this by running ifconfig.  The IP address of Metasploitable is 10.0.0.21.  I did this to spare myself a wild goose chase on my local area network.


2.  Start a Backtrack virtual machine and log in.  Backtrack will be the host conducting the Nmap scan.  Nmap scans can be conducted from many different operating systems, but this tutorial is heavily based on Backtrack (Linux).  

3.  Click the small black square towards the top of the screen in Backtrack.  This will open a new terminal.

 
4.  When the console opens, type nmap and hit enter.  Doing this shows Nmaps's usage, options and arguments.  The official guide explaining these options can be found here.


5.  Let's do a quick Nmap scan by typing: nmap 10.0.0.21 (Metasploitable).  Hit enter.  Without any arguments or options, Nmap with conducts a default SYN scan of the target. Congratulations.  If you are new, you've conducted your first network scan.


The default Nmap scan revealed that there are many ports and services open.  This would be detrimental to a business server because it broadens the attack surface for possible malicious intruders.  Whenever possible, disable any non-essential services.


6.  Now that we've observed a basic port scan, let's conduct something a little more customized.  Run the following command:

nmap -O -sS -p 1-65535 -T3 -oX /root/Desktop/scan_report.xml --stylesheet=nmap.xsl 10.0.0.21

Now that the command has been issued, let's break down what it did.

[nmap] We just ran this command, this is the Nmap application.
[-O]  OS detection.  Nmap will make it's best attempt to identify the OS is being used.
[-sS] SYN scan.  This is a half open method of scanning.
[-p 1-65535] - Manually specify to Nmap that we want to scan ports  1-65535.
[-T3] - Slower than normal scan time.  Important if you are Pentesting a fragile network.
[-oX  /root/Desktop/scan_report.xml] - Exports an XML report of findings to a specified directory.
[--stylesheet=nmap.xsl] - Formats the XML file so that it is readable by a web browser.
[10.0.0.21] - Metasploitable / Target Host


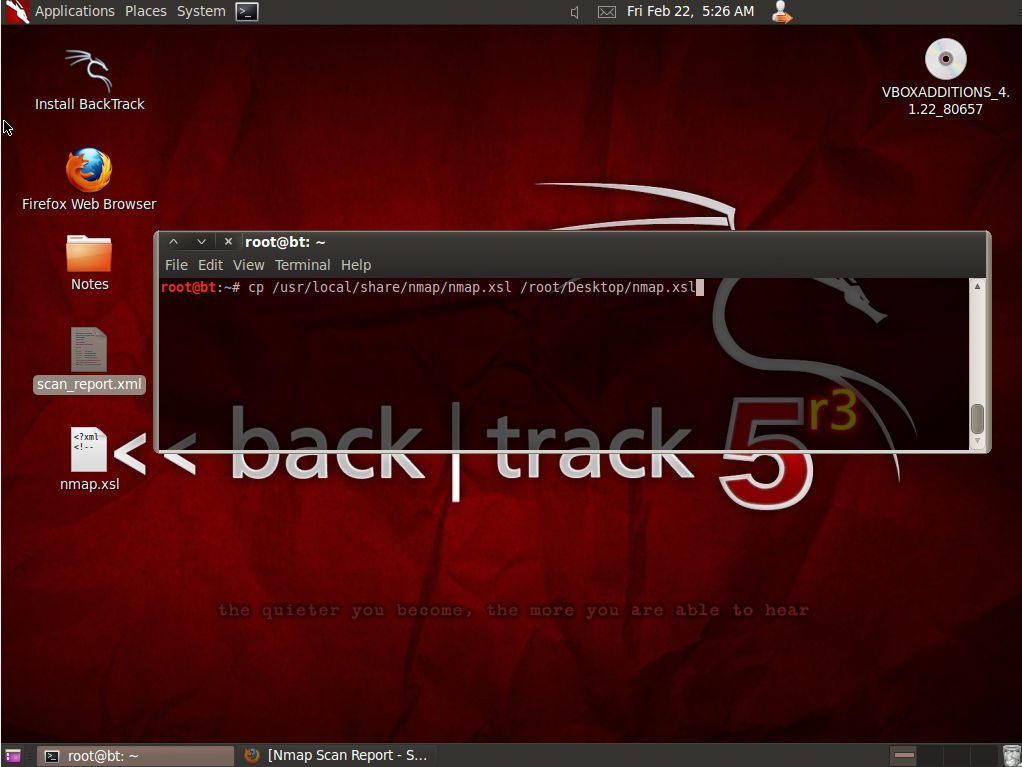
7.  It is necessary to have the nmap.xsl file in the same directory as the newly created scan_report.xml file that we placed on our desktop.  To copy this file to the desktop run the following command:  cp /usr/local/share/nmap/nmap.xsl /root/Desktop/nmap.xsl


8.  Now that the nmap.xsl file is on our desktop, we can simply double click the scan_report.xml.  This should automatically open the report in your web browser.  Below are screenshots of the said report.


Scan_report.xml continued...


Final Thoughts:


Nmap is an very important tool that is used by both security professionals and malicious attackers. 
To defend an asset from Nmap scans, disable all non-essential services.   Doing this limits the attack surface and "hardens" the target against malicious attackers.  Another way of defending an asset from network reconnaissance is to implement a finely tuned firewall.  

I'm done with this blog post...  It was more daunting than I previously thought.  If you have any questions, please feel free to ask in the comment section below.